
What do you do when it's time for those traditional formal pictures of your growing children, the photo places in your budget stink, and you can't afford prints at the good photographer's studio even with the half off discount former employees get for life? You either shell out your hard earned money for crappy pictures, or roll up your sleeves and do it yourself, of course.
Today's technology makes it as easy as such things can be. You don't have to be a pro, or even more than average to take a decent photograph...if you can get the child to cooperate. Mistakes can always be touched up in Photoshop, and red eye can be removed.
It's something we tried when Boo was still a newborn. We took her to get pictures made for her birth announcement, and after pictures where the angle was horribly wrong, three reschedules, and continual computer crashes, we decided to forget the photo center and just do it ourselves out of frustration. So, we threw one of the fancy baby blankets we got at her baby shower over our carrier, dressed her up, and snapped a few close ups. It took some tinkering with the lighting, but the end result was several times better than what we got elsewhere.
Here's the one month photo we took of Sneak yesterday. It's not perfect, but it's better than the ones we paid over $100 for when Boo was the same age. These will only cost us a few cents per print, and we can make replacements anytime we want without hassle.

 We found out it's more difficult to get a good picture of an older child the hard way. We never would have tried this in our old apartment, the one we called "the cave" for a reason. The lighting is a thousand times better in the house we're living in now, and we overestimated it big time.
As you can see here, we threw a white sheet over a box we set on our kitchen table and used the lace curtains in our dining room as a backdrop. It would have been pretty if we had about three times the lighting. As it was, our camera's flash went off, and the colors were all thrown off by the shadowing. This is the best fix I was able to do on a color version.
Luckily, Mom reminded me about the huge sheet of black felt I got several months back to use as a table cloth at my Usborne Books at Home shows. I'd completely forgotten about having the thing, and as you can see from the pictures below, the high contrast between Boo's dress and the black backdrop made a huge difference.
 So, we borrowed a halogen lamp from Hubby's parents to provide better lighting. Then we hung the sheet of felt over our entertainment center, and sat Boo on the lime green ottoman she received as an Easter gift this past year, and tried again.
She wasn't in near as good a mood the second time around, so we didn't get the big smiles we did before. The pictures turned out pretty well anyway.
Seeing Hubby act like a fool is usually good for a laugh or two from her no matter how grumpy or tired she might be.
Once we finished snapping the pictures, Hubby downloaded them from our camera while I tore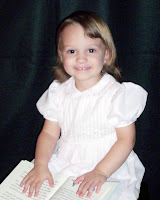 down the "set." Then we got the girls to bed before I went back to fix them as well as I could.
Between nearly a year working for the local paper and two years of making sales materials for the local radio station in my days before motherhood, I've gotten pretty fair and quick with photo prep. Otherwise, I doubt we would have tried this again after the issues we had trying to take Boo's infant pictures in "the cave."
It was mostly just a matter of fixing the color balance and taking out a nasty case of red eye. However, there wasn't enough felt to cover the ottoman, and it clashed something horrible, so I painted over it with black as best as I could to make it look like it too was covered in felt. Then I cropped them down, and presto, formal pictures made for pennies.
What are your DIY adventures?
Today's technology makes it as easy as such things can be. You don't have to be a pro, or even more than average to take a decent photograph...if you can get the child to cooperate. Mistakes can always be touched up in Photoshop, and red eye can be removed.
It's something we tried when Boo was still a newborn. We took her to get pictures made for her birth announcement, and after pictures where the angle was horribly wrong, three reschedules, and continual computer crashes, we decided to forget the photo center and just do it ourselves out of frustration. So, we threw one of the fancy baby blankets we got at her baby shower over our carrier, dressed her up, and snapped a few close ups. It took some tinkering with the lighting, but the end result was several times better than what we got elsewhere.
Here's the one month photo we took of Sneak yesterday. It's not perfect, but it's better than the ones we paid over $100 for when Boo was the same age. These will only cost us a few cents per print, and we can make replacements anytime we want without hassle.

 We found out it's more difficult to get a good picture of an older child the hard way. We never would have tried this in our old apartment, the one we called "the cave" for a reason. The lighting is a thousand times better in the house we're living in now, and we overestimated it big time.
As you can see here, we threw a white sheet over a box we set on our kitchen table and used the lace curtains in our dining room as a backdrop. It would have been pretty if we had about three times the lighting. As it was, our camera's flash went off, and the colors were all thrown off by the shadowing. This is the best fix I was able to do on a color version.
Luckily, Mom reminded me about the huge sheet of black felt I got several months back to use as a table cloth at my Usborne Books at Home shows. I'd completely forgotten about having the thing, and as you can see from the pictures below, the high contrast between Boo's dress and the black backdrop made a huge difference.
 So, we borrowed a halogen lamp from Hubby's parents to provide better lighting. Then we hung the sheet of felt over our entertainment center, and sat Boo on the lime green ottoman she received as an Easter gift this past year, and tried again.
She wasn't in near as good a mood the second time around, so we didn't get the big smiles we did before. The pictures turned out pretty well anyway.
Seeing Hubby act like a fool is usually good for a laugh or two from her no matter how grumpy or tired she might be.
Once we finished snapping the pictures, Hubby downloaded them from our camera while I tore
 down the "set." Then we got the girls to bed before I went back to fix them as well as I could.
 Between nearly a year working for the local paper and two years of making sales materials for the local radio station in my days before motherhood, I've gotten pretty fair and quick with photo prep. Otherwise, I doubt we would have tried this again after the issues we had trying to take Boo's infant pictures in "the cave."
It was mostly just a matter of fixing the color balance and taking out a nasty case of red eye. However, there wasn't enough felt to cover the ottoman, and it clashed something horrible, so I painted over it with black as best as I could to make it look like it too was covered in felt. Then I cropped them down, and presto, formal pictures made for pennies.
What are your DIY adventures?
No comments:
Post a Comment